I'm so predictable.
Last November, I wrote a post about typst,
a new type-setting software written in rust that's meant to replace \(\LaTeX\).
In that post, I said,
Well, I didn't get a job in that round, so I'm at it again! For realsy reals, this is the last year I'm doing this.
Well, I didn't get a job in this round either. I got close with one - full two-day interview. They said they loved my science, they said that they liked me, they said I did a great job explaining computational concepts to the wetlab folks (which should have meant a lot, since the job was about bringing "novel computational techniques" to the department)...
But they weren't sure I was the right "fit". I'm not sure, but this sounds like code for "we can't think of a good reason, but we went with someone else".
Anyway, I'm now waffling on whether I want to try again after all. But in the mean time, I'm working on my CV and resume in typst, and continuing to love it. As I mentioned in that last post, I was able to build my entire CV from scratch, replicating the layout that I'd needed a template for in \(\LaTeX\). This means I actually understand all of the components, so I can tweak them to my liking. Plus, I recently figured out how to build and post the pdfs using CI machinery on gitlab. Fun!
The Basics
As I mentioned in the last post, typst is in part a markup language, so you can get a lot of basic formatting using symbols, eg
= This is a header

*This will be bold*, while _this will be italic_,

- and bulleted
- lists are easy

So are numbered lists:

+ thing 1
+ thing 2

== This is a level 2 header!

More text
with semantic line breaks.
You'll want to run through the tutorial to go through all the basics - it's quite well done - but I'll just highlight a couple of things that will be relevant to this post and took me a while to fully grok.
The differences between set and show
There are two ways to change the way that things are displayed, and it took me a while to build the intuition about which one should be used when.
Using set
The set function I think of as changing the defaults of some other function.
So for example, you might use box to put highlights around some text.
This text: #box(fill: yellow)[is highlighted!]This results in:

In this code, we call the function box()
with the keyword argument fill set to yellow.
In "content" mode
(which is all of the document unless otherwise specified),
we call functions or place variables with #.
If I plan to be doing this a lot,
I can use set to make the fill argument default yellow.
In other words,
#set box(fill: yellow)

Some more #box([highlighted]) text #box([here!]).

But I can still #box(fill: blue)[use other] colors
or #box(fill: none)[no color] if #box()[I want to].
Notice that this does not hold me to yellow - it just changes the default.
In this case, the default fill was none,
and I can always get that back by making it explicit.
Using #show
The show function is used to replace the way something is rendered.
I pointed to this in my last post,
but you can do things like
#show "awesome": box(fill: red, outset: 2pt)[💃 Awesome! 💃]

Look at this awesome text.

Every time I type awesome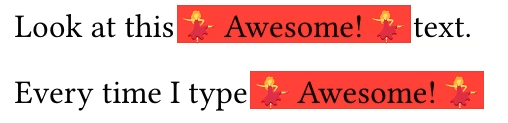
So this seems fairly straightforward - use set to change functions
and show to change the way things look, right?
Well...
What's confusing (at least for me)
One thing that I found confusing is that often you use set
to change the way things look.
One example - you use #set text(font: "Liberation Sans") to change the font.
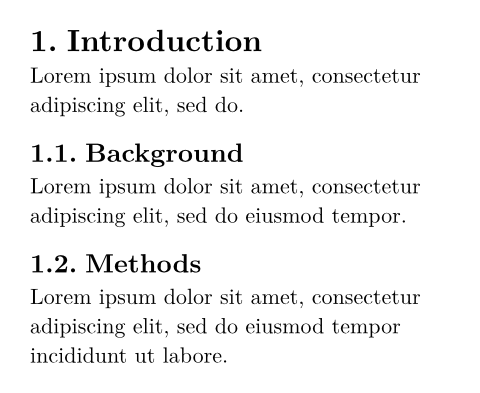
Another example from the tutorial shows the following:
#set heading(numbering: "1.")

= Introduction
#lorem(10)

== Background
#lorem(12)

== Methods
#lorem(15)
to get
or
#set heading(numbering: "1.a")

= Introduction
#lorem(10)

== Background
#lorem(12)

== Methods
#lorem(15)
to get
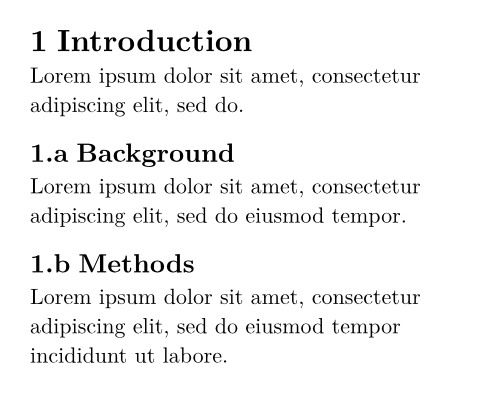
So... set here is changing the way stuff is shown - what gives?
The key here is that, even things that are written using the markup language are actually calling functions. In other words, the text above is like
#heading(level: 1)[Introduction]

#text()[#lorem(10)]

#heading(level: 2)[Background]

#text()[#lorem(12)]
etc... So we're using set to change the default of the functions that are called by the markup.
But I don't have a strong handle on what is implicitly calling functions,
so it's still a bit hard to reason about (eg here, there's also calls to #page, #par etc).
So mostly I just look for examples, either in my previous code, in the tutorial, or in this really excellent resource.
Writing the CV
I previously had a CV using the lovely "clean CV" template, which I had modified a bit using the CV builder template from overleaf[1] , and I am largely trying to replicate that style.
The first thing to do is to set some parameters to make things look nice, and write up the front matter saying who I am.
#import "includes/fontawesome.typ": *

#let name = "Kevin Bonham, PhD"
#let title = "Senior Research Scientist"
#let email = "blog@bonham.ch"
#let addr = "Waltham, MA"
#let phone = "555.555.5555"
#let orcid = "0000-0002-1825-0097"
#let github = "kescobo"
#let url = "https://blog.bonham.ch"

// shrink the margin, and set paper size
#set page(margin: 0.8in, paper:"us-letter")
// The original template uses a serif font, but I prefer sans serif
#set text(font: "Liberation Sans")

// put name and title centered and large
#set align(center)
#text(20pt, weight: "bold", name)
#linebreak()
#text(12pt, title)

//use small text for the contact info
#set text(8pt)
#set align(left)

// Use a grid to place contact info - things like `#phone` refer to
// the variables set at the top
#grid(
    columns: (2fr, 2fr, 1fr),
    gutter: 10pt,
    [#fa-phone() #phone], // these icons come from the fontawesome package
    [#fa-envelope() #email],
    [#fa-house() #addr],
    [#fa-orcid() #orcid],
    [#fa-github() #github],
    [#fa-globe() #url]
)

#set text(10pt)
Cool. Next, since I want to have a bunch of headers that display a date on the right hand side with some different formatting, I made a function that takes a date, a header level, and text, like so:
#let datedheader(
    date: none,
    level: 2, // can use different header levels
    leftcol: 2fr, // fr is "fraction" - this arg sets the proportion of the line the text uses
    content
    ) = {
    grid(
        columns: (leftcol, 1fr),
        gutter: 10pt, // this could be a parameter too, but 10 looks nice I think
        align(left)[
            #heading(level: level, content)
        ],
        align(right)[
            #heading(level: level, date)
        ]
    )
    v(-5pt) // remove some vertical space
}
With this I can now do, eg
#datedheader(date: "2006")[Impressive accomplishment]

Some text here

#datedheader(date: "2008", level:3)[This is a smaller line]

Other accomplishment.
The last major component is adding in my papers. This part was a bit tricky at first, because I was trying to use typst's native bibliography support. Unfortunately, typst doesn't currently have support for multiple bibliographies, and I wanted to so some things like filtering on certain tags, or adding some text at the beginning if I was co-first author. So I ended up rolling my own function that would format citations from a YAML file.
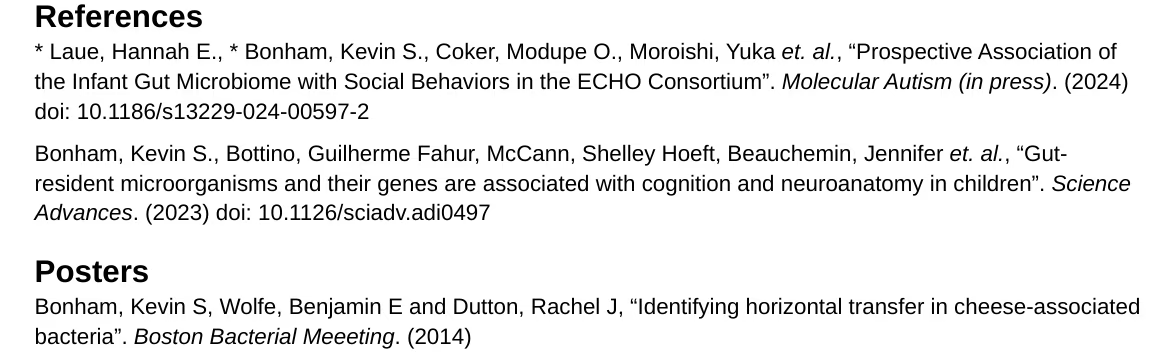
This one is a little complicated, so let's see what it's going to look like first. Here's a couple of references from my YAML bibliography:
LaueProspectiveAssociationInfantGut2024:
  type: article
  parent:
    - type: periodical
      title: Molecular Autism (in press)
  title:
    value: Prospective Association of the Infant Gut Microbiome with Social Behaviors in the ECHO Consortium
    sentence-case: Prospective association of the infant gut microbiome with social behaviors in the echo consortium
  date: 2024
  author:
    - "Laue, Hannah E."
    - "* Bonham, Kevin S."
    - "Coker, Modupe O."
    - "Moroishi, Yuka"
    - "Pathmasiri, Wimal"
    - "McRitchie, Susan"
    - "Sumner, Susan"
    - "Hoen, Anne G."
    - "Karagas, Margaret R."
    - "Klepac-Ceraj, Vanja"
    - "Madan, Juliette C."
  doi: 10.1186/s13229-024-00597-2
  url: https://doi.org/10.1186/s13229-024-00597-2
  tags:
    - cofirst
bonhamGutresidentMicroorganismsTheir2023:
  type: article
  title:
    value: "Gut-resident microorganisms and their genes are associated with cognition and neuroanatomy in children"
  author:
  - Bonham, Kevin S.
  - Bottino, Guilherme Fahur
  - McCann, Shelley Hoeft
  - Beauchemin, Jennifer
  - Weisse, Elizabeth
  - Barry, Fatoumata
  - Lorente, Rosa Cano
  - Consortium, The RESONANCE
  - Huttenhower, Curtis
  - Bruchhage, Muriel
  - D'Sa, Viren
  - Deoni, Sean
  - Klepac-Ceraj, Vanja
  date: 2023
  page-range: eadi497
  url: https://www.science.org/doi/abs/10.1126/sciadv.adi0497
  doi: 10.1126/sciadv.adi0497
  parent:
    - type: periodical
      title: Science Advances
      issue: 51
      volume: 9
bonham-bbm2014:
  parent:
    - type: conference
      title: Boston Bacterial Meeeting
  type: misc
  title:
    value: Identifying horizontal transfer in cheese-associated bacteria
  date: "2014"
  author:
    - "Bonham, Kevin S"
    - "Wolfe, Benjamin E"
    - "Dutton, Rachel J"
  tags:
    - poster
And I want this to look something like this:
So I wrote this function - see the comments for explanation:
// Format a bibliography from a YAML file.
// Args:
//   - file: string path to yaml file
//   - entries: list of strings with cite keys. If empty, do everything.
//   - tag: a string representing a tag. If not none, acts as a filter
#let refs(file, entries: (), tag: none) = {
    // if entries arg is an empty list (default), get all the keys in the yaml file
    if entries.len() == 0 {
        entries = yaml(file).keys()
    }

    for (entry, fields) in yaml(file) {
        if entry not in entries {
            continue
        }
        if not tag == none {
            // if a tag argument exists and the entry doesn't have that tag, skip
            if "tags" not in fields or tag not in fields.tags {
                continue
            }
        }

        // add asterisk if entry has "cofirst" tag
        if "tags" in fields and "cofirst" in fields.tags {
            [\* ]
        }
        // add a dagger if entry has "corresponding" tag
        if "tags" in fields and "corresponding" in fields.tags {
            [#sym.dagger ]
        }

        let auth_n = fields.author.len()
        let auths = ()
        // truncate author list if more than 4 entries
        if auth_n > 4 {
            auths = fields.author.slice(0, count:4)
            [#auths.join(", ") _et. al._]
        } else {
            auths = fields.author
            auths.join(", ", last: " and ")
        }
        // Now format the entries.
        [, "#eval("[" + fields.title.value + "]")"]
        [. #emph(fields.parent.at(0).title)]
        [. (#fields.date)]
        if "url" in fields and "doi" in fields {
            [ doi: #link(fields.url, fields.doi)]
        }
        parbreak()
    }
}
Conclusion
And there you have it! If you want to see the full thing (ever evolving), check out the repo if you want to see the whole thing.
- ⤶ If you find yourself needing to write latex and you don't know what you're doing, the tutorials on Overleaf are really excellent