It's that season again! No, I'm not talking about the High Holy Days, Halloween, or Thanksgiving... It tenure-track faculty application time!
I have recently been playing around with \(\LaTeX\), the type-setting engine, and I've hit upon a pretty sweet workflow for writing application materials using it along with git, enabling me to write one "generic" or template version, then tweaking or filling in place-holders for specific positions.
Let me show you!
Motivation
To grasp the benefits of the new system, it might be worth describing my previous workflow and its limitations. My previous workflow was as follows:
- Make a google doc for each application component (Eg. Cover letter, Research statement, Teaching statement, Statement on diversity and inclusion). I would include places where I'd want to insert job-specific information, like
In my independent lab at INSTITUTION, I will...
or
Dear XXX and members of the search committee, ...
- For each job app, make a copy of each document, and rename it to eg "Northeastern - Cover Letter" from "Cover Letter".
- Change all generic placeholders to specific ones, eg.
In my independent lab at Northeastern, I will...
- Add any job-specific flavor. For example, If I'm applying to a job at HMS, I'll mention in the cover letter that it's where I did my PhD, and maybe do some name-dropping. Or when applying to a place that has a great teaching and learning center (like Northeastern's CATLR or Harvard's Bok Center), I'll add some stuff about working with them to my teaching statement.
- When I'm ready to apply, click through each document, and download it.
There are several limitations to this approach, here's just a smattering:
- Tons of duplication; I applied for ~13 positions this year, and each one has at least 4 documents, meaning that I have over 50 documents from this year alone. ... and I am probably on the low end of total applications
- All the pointing and clicking is tedious. Making copies, opening the documents, changing document names, downloading, etc. Doing this a few times would be bearable but 50 times?
- Nothing is scriptable; if I find a typo after I've made copies and want to change it, it means copying, clicking through ~13 documents, finding the right place, and pasting. The opportunities for missing things or screwing them up is extensive.
This last is particularly painful if, after I've made all of my copies, as I'm working on one of the specific apps, I find something I want to change, even just a typo. It means going back to the template and every copy I've made manually. Sometimes the documents have already undergone a bunch of revision, so even finding where the problem is, or knowing how persistent the type was can be a challenge.
What I wanted
So, what I wanted was something that
- has a single master version of each document
- is easy to propagate changes from any version and regenerate outputs
- doesn't have dozens of versions floating around in different folders
LaTeX Workflow and templates
First, a disclaimer about what this post isn't:
- An introduction to
git- if you're not familiar with it, maybe this can be your motivation to learn! It's worth it! And there are a ton of good resources about it online already. - An introduction to \(\LaTeX\) - frankly, you wouldn't want me to try to teach it,
I've mostly cobbled together what little I know from looking at Overleaf Documentation
and the TeX Stack Exchange.
I do provide some templates to get you started.
In case it helps, I'm using the LaTeX workbench extension of VS Code
on Ubuntu and installed LaTeX with
sudo apt install texlive-full, but you'll want to look up install instructions for your own OS. - Advice on how to apply for academic positions or what to put in your cover letter / CV / research statement etc. I haven't landed an academic job yet, so you wouldn't want to trust my advice on this anyway.
Generic files with placeholders
Write your materials as you normally would, except for the following:
- Use semantic line breaks.
- Put anything that will likely change for your different apps on their own line
Semantic line breaks
Semantic line breaks (sembr) can take a little getting used to,
but they make version control on plain text documents
much more powerful.
The basic idea is that, in file formats like markdown and TeX,
newlines are treated the same as spaces
in the rendered text.
For example, this paragraph looks like this
in the source code:
Semantic line breaks (sembr) can take a little getting used to,
but they make version control on plain text documents
much more powerful.
The basic idea is that, in file formats like markdown and TeX,
newlines are treated the same as spaces
in the rendered text.
For example, this paragraph looks like this
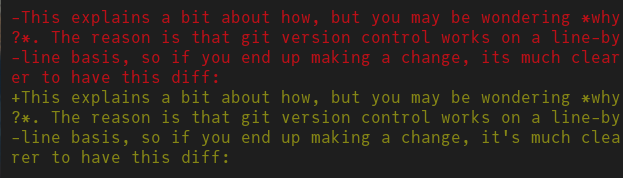
in the source code:This explains a bit about how, but you may be wondering why?. The reason is that git version control works on a line-by-line basis, so if you end up making a change, it's much clearer to have this diff:
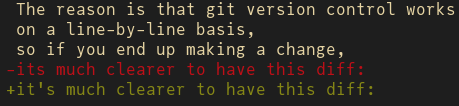
rather than this one:
It will also make it easier to make corrections and changes to one version and propagate them to other versions as we will see.
Separate lines for placeholders
The exact same logic applies to placeholders (eg. "...at INSTITUTION" to "...at Northeastern"); since you know you're going to change these bits, keep them on separate lines to keep the diffs nice.
But it also keeps your app-specific changes separate from any other changes that you might make, which makes it easy to merge those changes without conflicts.
For example,
suppose I have the following text about
\hl{INTITUTION}
that has a typoo on the last line.
Suppose I go though and change \hl{INSTITUTION}
to Northeastern in one of my applications,
then, as I'm editing my Harvard application,
I notice the typo.
I can go fix the typo on my main branch,
then merge the fix for that line into my other branches
without conflicting with any of the other changes.
Don't worry, I'll show how to do this in a bit.
Use separate branches for specific applications
Once you have your individual generic documents ready,
it's time to customize them for your specific applications.
Rather than making copies of the files,
use git branches.
For example:
❯ git checkout -b umass-ex # University of Massachusetts, Example
# make changes to `research.tex` and save them
❯ git commit -am "update research statement"
# make changes to `teaching.tex`
❯ git commit -am "update teaching statement"
If you notice a typo that you want to fix, commit everything you have, then
❯ git checkout main # this might be `master` instead of `main`
# fix the typo
❯ git commit -am "fix typo"
❯ git checkout umass-ex
❯ git merge main
If you have other branches, you can just check them out and merge there as well.
cherry-picking (advanced)
Sometimes, I don't want to break up my writing flow
by dealing with all of this branch changes.
Instead, you can wait and then use git cherry-pick to grab
a single commit from your app-specific branch onto main.
That is, on the umass-ex branch:
❯ git commit -am "update research statement"
# fix a typo
❯ git commit -am "fix apostrophe"
# keep working on research
❯ git commit -am "more substitutions on research statement"
# work on teaching
❯ git commit -am "update teaching statement"
# now ready to update `main` branch
❯ git log --oneline
Running git log --oneline will give you a list of commits
with your commit messages in reverse order
(see why having descriptive messages is nice?)
and the commit hash which you can use to refer to each commit.
Now, to get just that one change back on to your main branch
(or any others),
just check the branch out and do git cherry-pick:
❯ git checkout main
❯ git cherry-pick 11aa748
Now, if you've been using semantic line breaks,
and assuming you haven't previously made changes to the same line,
your main branch should be updated! Magic!
Export
This was the place that felt like the most time was saved.
Clicking through file -> Download As -> pdf on
each document was so tedious,
especially as, if you're anything like me,
you'll have to do this 10 times per document as you notice more and more typos.
Because the name of your current git branch can be identified
with the command git rev-parse --abbrev-ref HEAD,
you can simply checkout each branch and make a copy of each .pdf
with the branch name attached.
I use fish, which has a slightly different syntax
than the shell you might be familiar with,
but the following makes a copy of each pdf into my ~/Downloads directory
with the name of the git branch prepended (eg umass-ex-research.pdf):
for f in (ls jobapps/*.pdf)
    cp $f ~/Downloads/(git rev-parse --abbrev-ref HEAD)-(basename $f)
end
The same thing in a POSIX shell like bash or zsh is something like this:
for f in $(ls jobapps/*.pdf); do
    cp $f ~/Downloads/$(git rev-parse --abbrev-ref HEAD)-$(basename "$f")
done
Conclusion
I'm not sure if this would save you a ton of time if you haven't already been working on learning LaTeX for other reasons. But as I have been, it was a good learning experience and (I think) ultimately did save me a bunch of time.
If you want to play around with it, you can use this demo repo that I set up to give it a whirl. Have fun!